|
ePSXe (enhanced PSX emulator) is an emulator of the Sony PlayStation video game console for x86-based PC hardware. It was written by three authors, using the aliases "Calb", "_Demo_", and "Galtor". It has been described as the best freeware Playstation emulator available and for us is the best emulator avaliable. ePSXe makes use of a plugin system to emulate GPU, SPU, and CD drive functions, similar to the model first introduced in PSEmu Pro. This approach is also taken in PCSX, PCSX2, and Project64. ePSXe is closed source with the exception of the application programming interface (API) for its plugins. INFORMATION: - Developed by: calb, Galtor and _Demo_ - Latest release: v.1.7.0 (24-May-2008) - OS: Linux, Microsoft Windows - Available in: Multilingual - Development status: Active - License: Freeware - Website: http://www.epsxe.com/ SYSTEM REQUIREMENTS: * Processor: Pentium 200 MHz, recommended 1 GHz. * RAM: 256 MB RAM, recommended 512 MB RAM. * Graphics card: 3D graphics card needed with support for OpenGL or DirectX. * Operating system: Windows: 9x (95, or 98/98SE), NT (XP, 2000, Vista, etc) -- GNU/Linux (any distro will do) * CD-ROM: 16x or faster (optional) HISTORY (from Wikipedia): For half a year, ePSXe was developed in secret, away from the public eye. When released on October 14, 2000, ePSXe was a revolution in the PSX emulation scene, boasting higher compatibility and performance than other PlayStation emulators of the time. When ePSXe 1.6.0 was released on August 5, 2003, its development seemed to halt. In fact there were even rumors claiming that the source code had been lost due to a hard disc failure. This was until April 5, 2008 when the developers of ePSXe made a public statement revealing that in summer 2007, they had decided to continue development of the emulator, on encouragement from users. On May 24 2008, ePSXe version 1.7 was released. HOW TO CONFIGURATE EPSXE: 1 - Download epsxe from his website or from our downloads page. 2 - Extract epsxe to a folder of your hard drive. 3 - Put the bios in the bios folder of epsxe. Since bios are copyright material we don't provide the psx bios. 4 - Download the graphics plugins, cdrom plugins and audio plugins and extract them in the plugins folder of epsxe. 5 - Double click in epsxe.exe  6 - CONFIGURING PAD: First go to where it says "Config": Select Game Pad - Port 1 - Pad 1 and click there 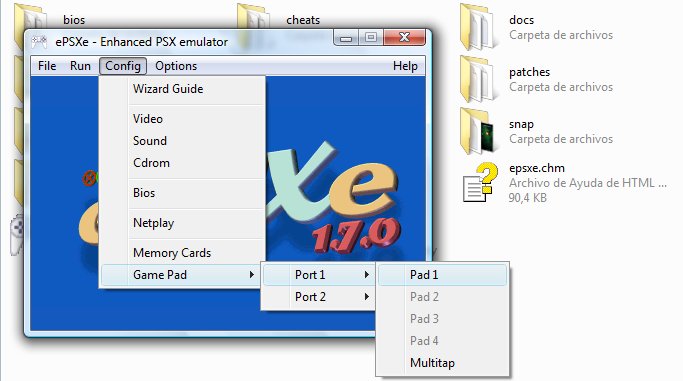 Now configure your pad and it should look like this. Remember that the first pad that you have in windows is usually Dxjoy1 and that you can't put the same kind of vibration in the 2 motors so is better to put sine in one and constant in the other. 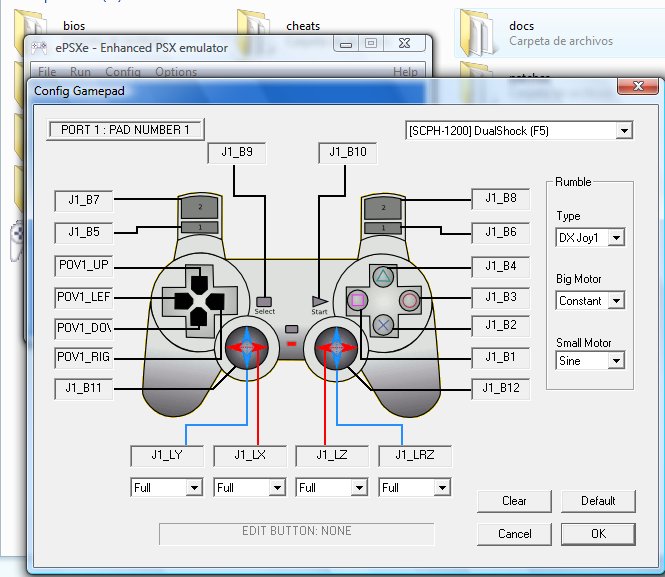 As you can see in this image ePSXe v.1.7.0 supports different kind of controllers but you have to check each game entry to see what are supported for each game. Dualshock is the most compatible one since most of the digital games works with it in the emulator just pressing the F5 key during the game to enable or disable the analog mode. 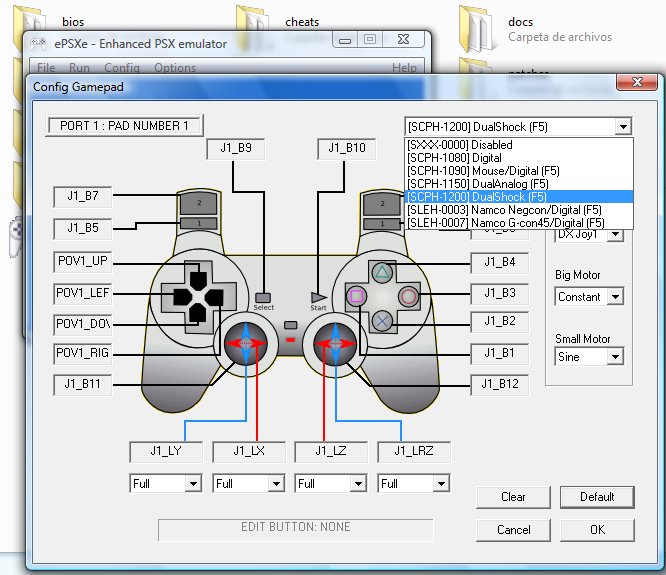 IMPORTANT: For at least a couple of games (Jinx, Disney's Donald Duck) to work properly in ePSXe the pad 2 have to be disabled in the emulator, just like this screenshot show: 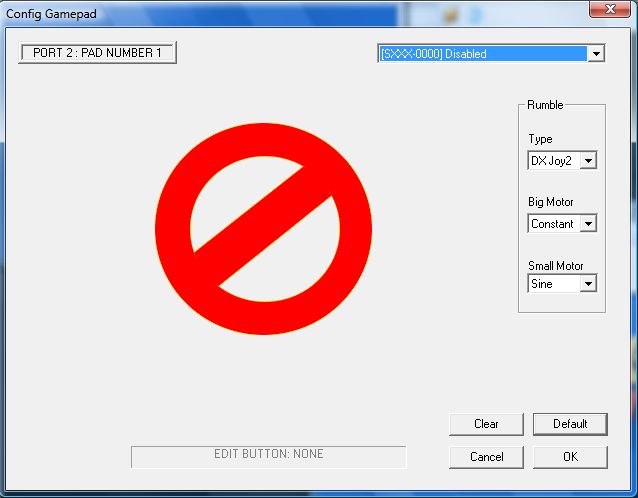 7 - CONFIGURING THE VIDEO PLUGIN: Now that you have configure the pad plugin is time for the video one, so go "Config": Video and all the video plugins that you have in the plugins folder will appear like this. 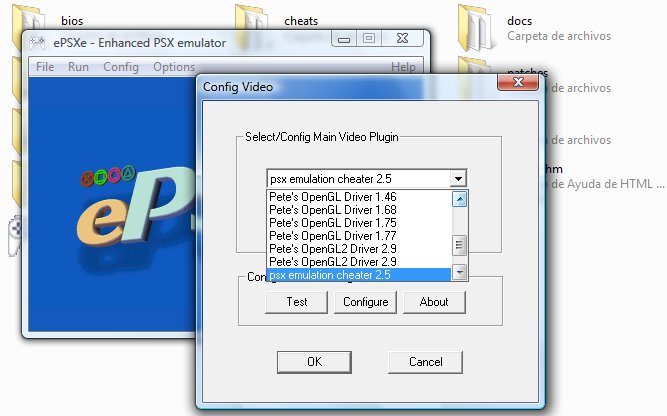 Select "psx emulation cheater 2.5", why? 'cause you can only use Pec with that plugin or not use and it will only use the normal plugin that you choose in Pec. This is how PEC plugin looks:  Notice that all the video plugins avaliable in the plugins folder appear there, so choose a plugin and configure it. This is the best configuration for Pete's OpenGL2 Driver 2.9: 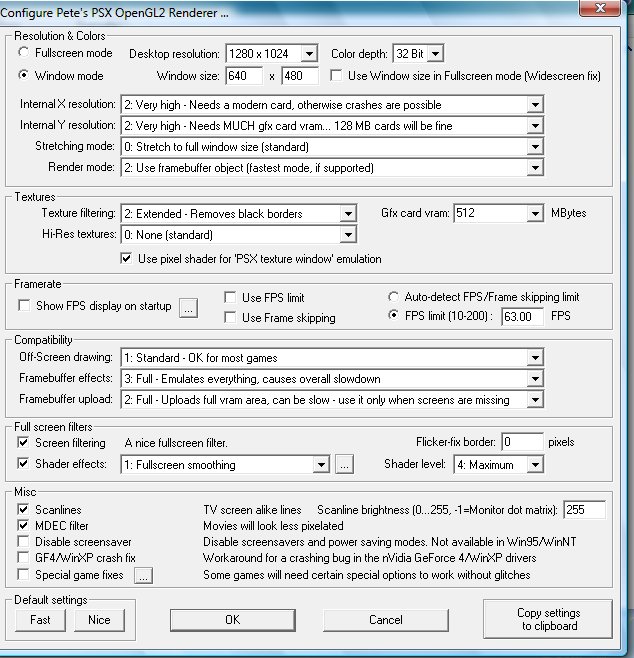 This is the best configuration for Pete's D3D Driver v.1.77 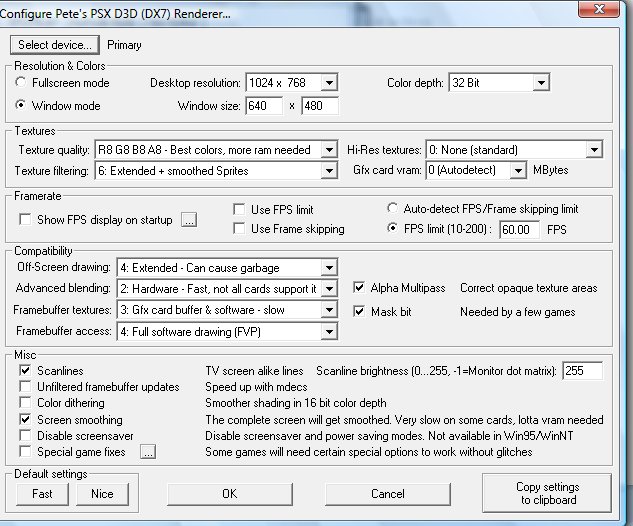 This is the best configuration for P.E.Op.S. SoftDriver 1.18 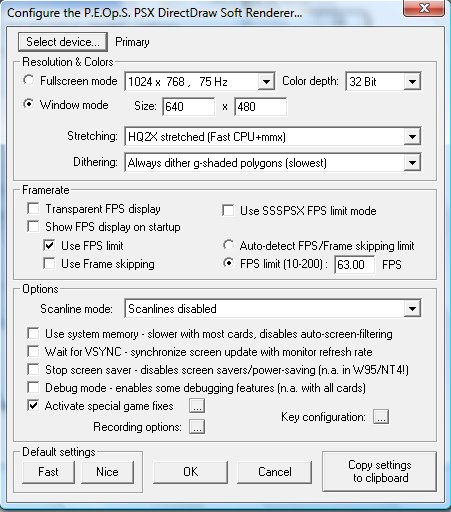 This is the best configuration for GSdx 884 (MSVC 15.00, SSSE3) v.1.13 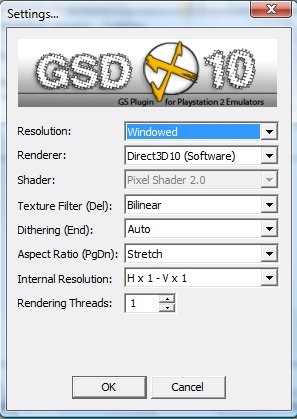 This is the best configuration for GpuBlade Soft v.1.4.1 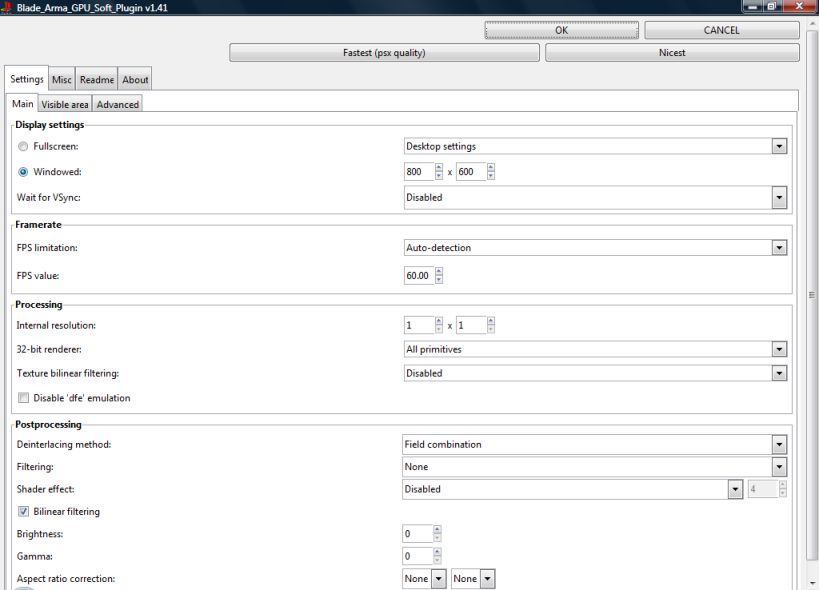 Notice that in all the cases ePSXe v.1.7.0 got always another plugin that is P.E.Op.S. SoftDriver 1.18 that can be choose at the same time that the other one and changed during game pressing the F7 key. 8 - CONFIGURING THE AUDIO PLUGIN: After configure the video plugin is time for the audio plugin, go to "Config": Sound and select an audio plugin (be sure that the "Sound enabled" option is enabled: ePSXe SPU core 1.7.0 doesn't need any configuration and is right now the best audio plugin since it supports more sounds that the other plugins and the sound quality is the best one. 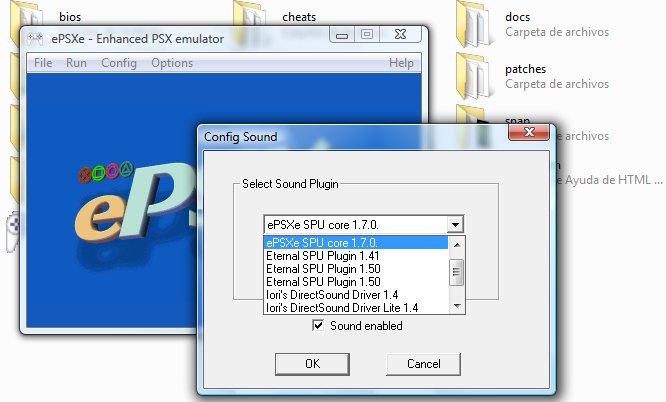 But since for some games other audio plugins are needed here are the other configurations. Eternal SPU Plugin 1.41 or v.1.50 beta 1 or beta 2 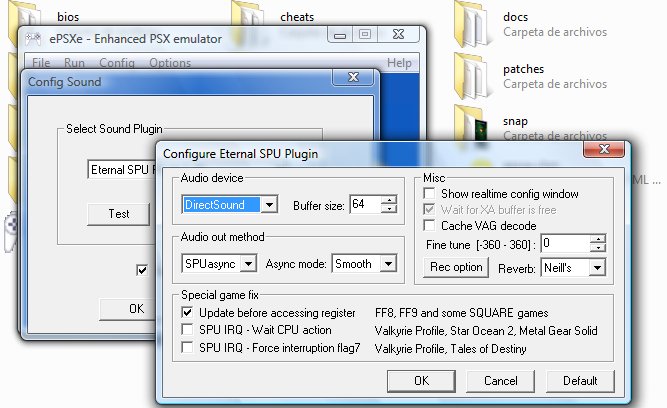 P.E.Op.S. DSound Audio Driver 1.9 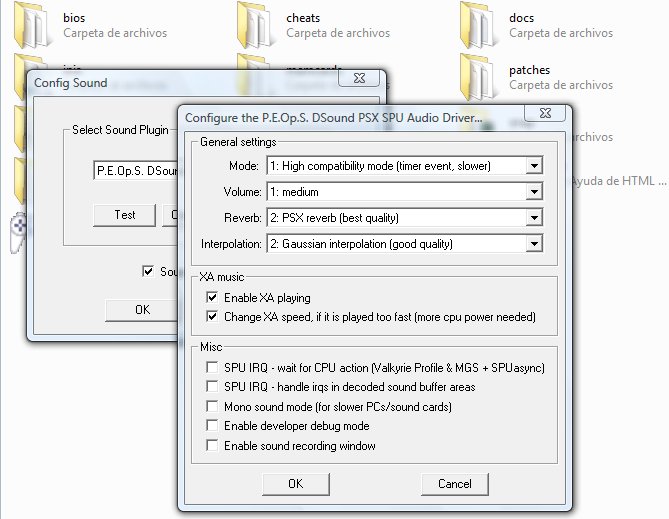 P.E.Op.S. Sound Audio Driver 1.10 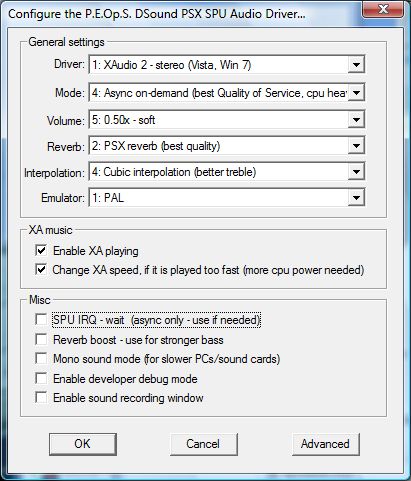 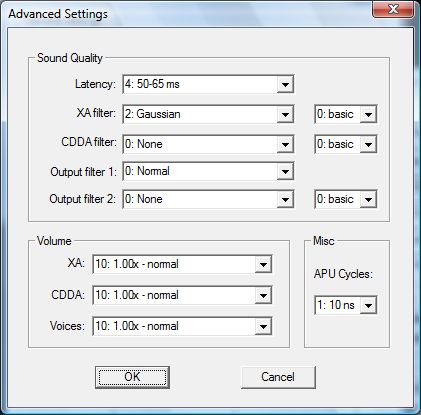 9 - CONFIGURING THE CDROM PLUGIN: Time for select a cdrom plugin, go to "Config": CDrom and click there:  ePSXe CDR should work fine for one cd games, but due to a bug for games that needs to change the cds you will need a external cdrom plugin, here are the better ones: P.E.Op.S. CDR Driver v.1.4: The best one since it allows to load sbi file that will make that games that have protection will work on the emulator.  Sapu's CD-Rom plugin v.1.0  10 - IMPORTANT: Be sure that go to "Options" and that these options are checked: "Auto load ppf files enabled" (this will allow to load the ppf files that you have in the patches folder of the emulator) and in "Country": "Autodetect" (the emulator will adjust the fps for each game).  11 - SELECTING THE BIOS: Now go to "Config" and "Bios" and select one from the bios folder.  12 - SELECTING MEMORY CARDS: Now go to "Config" and select "Memory cards", put one in each memory card from the ones that you got on the memcards folder of the emulator and that's all. 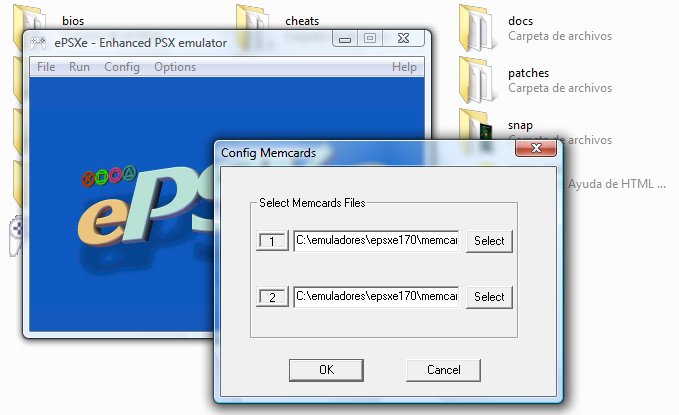 13 - ePSXe is now fully configuration so go to file and press exit so that way you configuration will be saved. 14 - Playing a game: Insert a cdrom in your cdrom drive, open epsxe.exe and go to "File": "Run CDROM" and that's all. 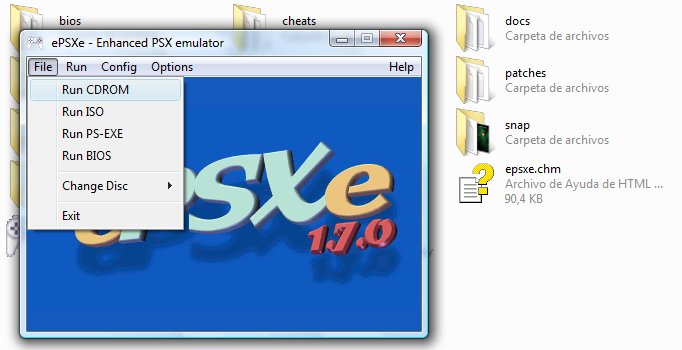 If you want to run an iso just click in "Run ISO" and select one from any browser of your computer. 15 - To change a disc when the game asked you to change a disc press ESC and select "File": "Change disc" and select cdrom or iso (depending of what you got), and wait until windows detect the new one and after that press ok in the emulator to change the disc and continuining playing. 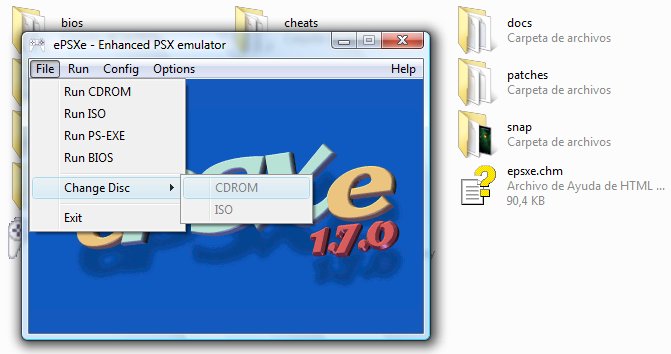 16 - Using savestates: If you want to make a savestate in ePSXe just press F1 during the game (some game doesn't have savestate support) and to load one just select one of them browsing with F2 and press F3 to load the one that you want. 17 - If you want to make a screenshot in ePSXe just press F8. 18 - Speed limit activate/deactivate with F4 key. NEW FEATURES SINCE EPSXE V.1.8.0: Since v.1.8.0 ePSXe got new features that I'm going to explain now: 1 - MEMORY CARDS: For the first time each memory card can be disabled in the emulator, this is how the memory card looks right now, if you want to disable any of the memory cards just leave that memory card not selected. 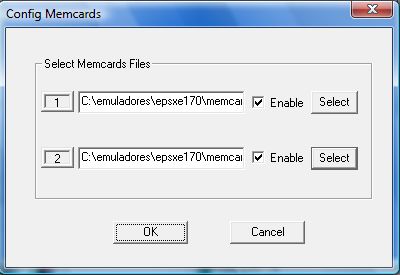 2 - CHEATS: For the first time ePSXe can have cheats without using an external device or PEC. To activate cheats in a game you got to do first some things. - Using the game serial, I'm going to use as example the game Codename Tenka in his USA version create a txt file and put there the cheats that you want. The file should go in the cheats folder of ePSXe and look like this:  To add codes you just have to put them this way:  If you had finished adding cheats to the file, you can start ePSXe with the game that you want to use cheats and when the game have started to load press the Esc key and go here:  Select cheats and this window will appear, here is without cheats but if you create the file properly you will see your cheats, just enable the ones you want and after that go to "run" and "continue" that will return you to the game but this time with the cheats. There are a few games that in ePSXe are not recognized by his own serial, for example in the game Hermie Hopperhead (Playstation the Best version) that game doesn't appear in ePSXe as SCPS-91016, if you activate the logs in the emulator it appears as SLU__387.31, in this case the cheat file name should be SLU__387.31.txt. NEW FEATURES SINCE EPSXE 2.0: ePSXe v.2.0 has a lot of changes from previous versions so a complete guide is needed. Double click in epsxe.exe  1 - GAMELIST: The first thing that you can notice when you click in "file" is that there are a new option called "Open Gamelist". 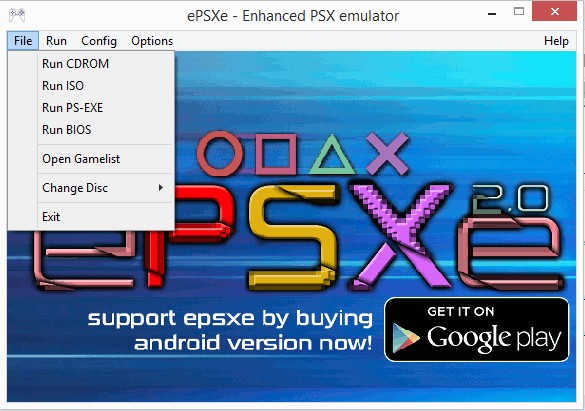 To Open Gamelist you can click there or in the letter "S" of the ePSXe logo, and you will see this. 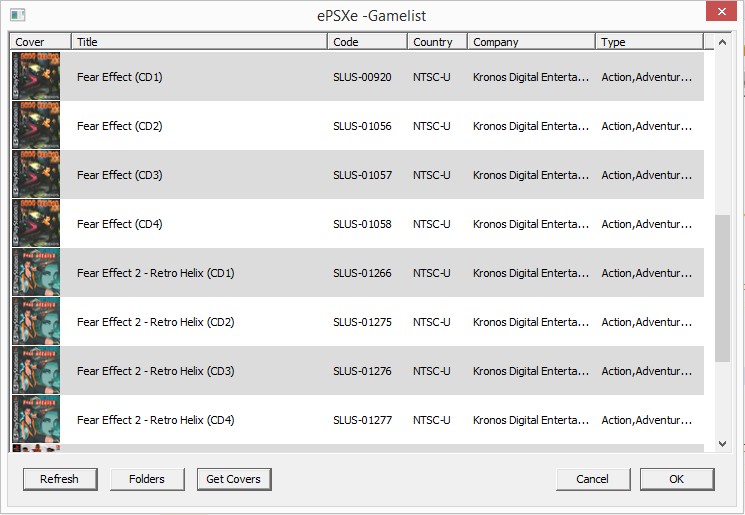 In the gamelist first click in folders and you will see this:  Here you can choose the different directories where you want ePSXe to look for games. After that press in the "refresh" button and your games will appear. After that you can press in "Get Covers" and ePSXe will connect to the ePSXe website to download the covers that are for the games that you have in the gamelist. To run a game you can select one in the gamelist and then select the "ok" button or just double click on that game. To exit the gamelist just press the cancel button. 2 - PLUGINS: When you click in "Config" you can see another of the changes in this version of ePSXe, the "Plugins" button. 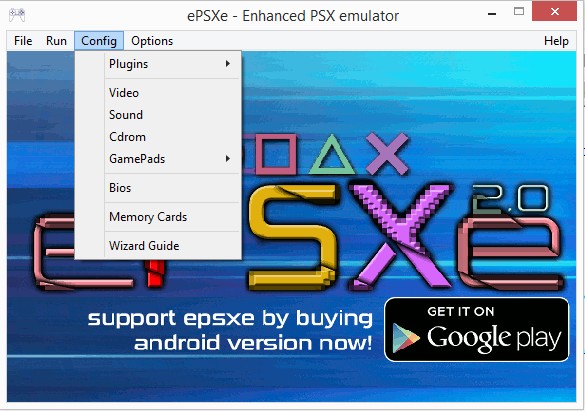 If you click in "Plugins" you can see the different options. 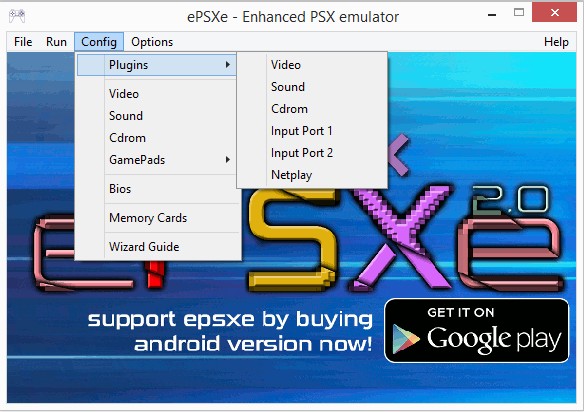 2-A: VIDEO: In video as it was before you can choose what video plugins you want to use with a new feature, since there are 2 new video plugins, let's explain them. 2-A-1: ePSXe GPU Core 2.0: A new software plugin (requires a videocard supporting OpenGL2 + GLGS shader)  In Internal Resolution there are 3 options: 1 - Normal resolution: The psx game resolution. 2 - Resolution x2: This increase the game internal resolution x2 giving a better visual quality. 3 - Resolution x4 (slowest): This increase the game internal resolution x4 giving the best visual quality but it can slow in some games and in PC that are not very powerful. In "Brightness profile" there are 4 options: 1 - Original: The game original brightness 2 - Brightness: Increase the game brightness 3 - More brightness: Increase more the game brightness 4 - Most brightness: Increase a lot the game brightness Stretching mode: There are 3 options: 1 - Stretch: Try to stretch the game image to fill the screen. 2 - 4:3 : Stretch the image to a 4:3 aspect 3 - Widescreen: Stretch the image to a widescreen aspect. Run Mode: Here's there is only one option Thread. The fps options are the same as in pete plugins. Screen filtering: Here there are 2 options: A - Filter for 2d games: 0 - None 1 - 2xsai: Use a 2xsai filter. 2 - xBRZ x2: Can only be used in internal resolution 1 = Normal resolution 3 - xBRZ x3: Can only be used in internal resolution 1 = Normal resolution 4 - xBRZ x4: Can only be used in internal resolution 1 = Normal resolution B - Shaders: IMPORTANT - This plugin use shaders but not the Opengl2 shaders, you have to use the ePSXe shaders and put them in a different folder than the opengl2 shaders since the shaders names are the same. The scanlines part is just in pete plugins. Remove Top/Bottom bars: These option will try to remove the top/bottom black bars in pal games (but only worls in some of them), works for example in Heart of Darkness.  The "Overscan" option allows to move the screen up or down selecting between 0 to 8. Notice that in all the cases in ePSXe v.2.0 ePSXe GPU Core v.2.0 is always the plugin used when the player press the f7 key during gameplay. 2-A-2: Pete's OpenGL2 GPU Core 2.0.0: An enhanced version of Pete Opengl2 with support for the Subpixel precission hack and some fixes.  2-B: SOUND: Here the audio plugin can be selected. There is a change in ePSXe SPU Core when you click in "Config" you see this:  In "Sound latency" there are 2 options: 1 - Normal latency: Recommended for most of the games. 2 - Low Latency: Needed for Bust-A-Groove 1 & 2, is better not to use it on other games since it can be slow depending of your computer. In "Sound Effects" there are 3 options: 1 - No sound effects. 2 - Sound without reverb/filters 3 - Full sound effects: This is the recommended one. 2-C: INPUT: In this version of ePSXe the player can choose between using the internal ePSXe pad plugin or an external one.  Pokopom XInput Pad Plugin 2.1 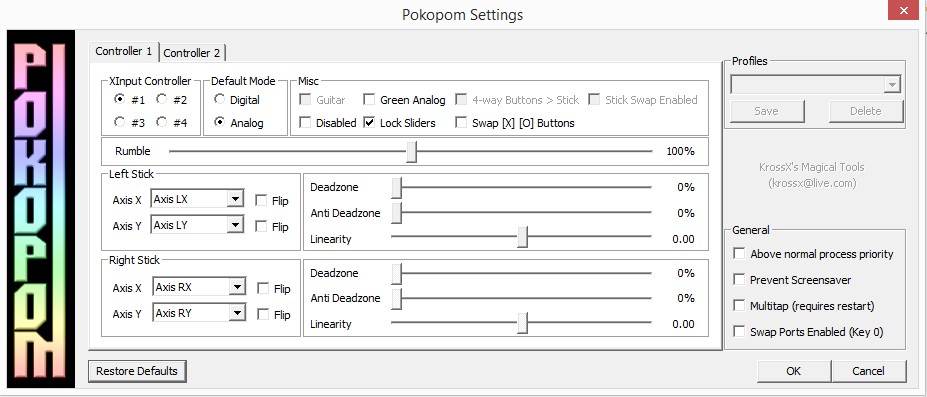 One of the new features in ePSXe v.2.0 is the emulation of the Konami Justifier in the ePSXe INPUT Core v.2.0. 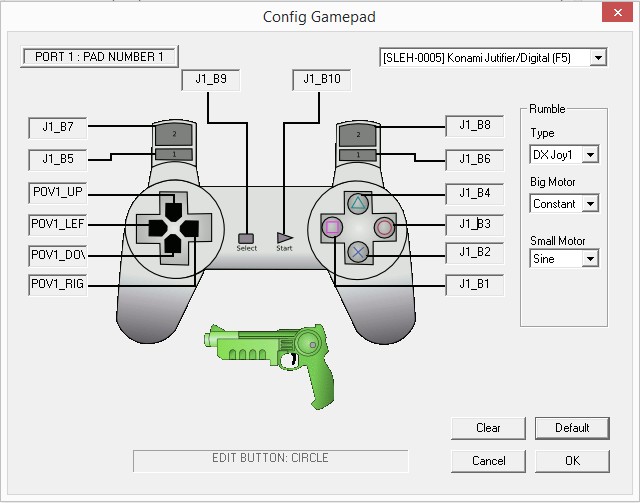 The Konami Justifier is emulated using the PC mouse to move the gun, the 3 mouse buttons to fire, pause the game, use the other fire, and the space bar key to reload. If you want to use the multitap just go to "Config", then "Gamepads", then "Port 1" and select Multitap, that enable the "Pad 2", "Pad 3" and "Pad 4" in that port. If the game that you have don't say the opposite you should use the multitap in the port 1 for it to work. 3: OPTIONS: Here there are some new features. 3-A: CPU MODE: Here there are 2 choices - Dynarec (fastest mode, you should enable it by default) and Interpreter (Slower but most accourate, try if dynarec gives errors). 3-B: GTE HACKS: There are 2 options here: - Widescreen: Using this hack will make the games to force to a 16:9 screen format, it doesn't work well in all the games and in somes can show glitches, is not recommended to use it. - Subpixel precission: Allows a better graphic quality specially in driving games, recommended. Only supported in the 2 new video plugins. 3-C: UI LANGUAGE: Here you can change the ePSXe language. The default language is the language that you have in windows, for example if windows is in spanish ePSXe will show all the options in spanish language and you can change to English if you want. There are 4 languages avaliables right now English, Italian, Japanese & Spanish. 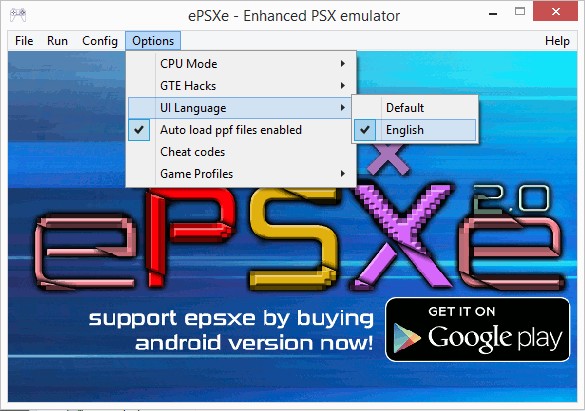 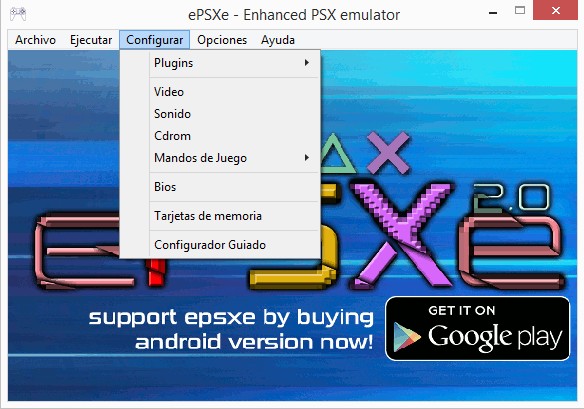 3-D: AUTOLOAD PPF FILES ENABLED: If you have this option on it will load any ppf file that you have on the "patches" folder. In this version of ePSXe you can enable more than one ppf patch for the same game adding .00 to the first ppf file and .01 to the second one. This version allows ppf version 3 patches. 3-E: GAME PROFILES: Another new feature of ePSXe v.2.0 is that it allows to Save a profile for each game that you run on it. The profiles saves the video plugin, the audio plugin, memcards, etc. It doesn't save the cdrom plugin used. If you want to delete a profile that you made just select "delete profile" when you are running that game in the emulator. 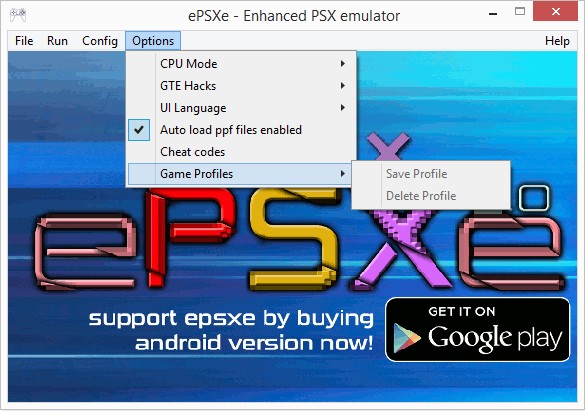 4 - AUTOFIRE: The last new feature of ePSXe v.2.0 is the Autofire function. 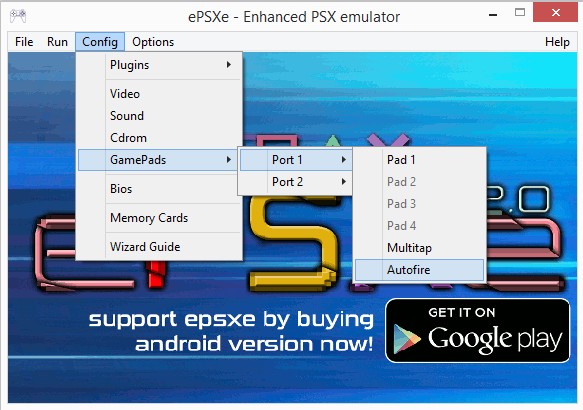 Here you can configure the frequency and the button (or buttons) that you want it to be in autofire mode. 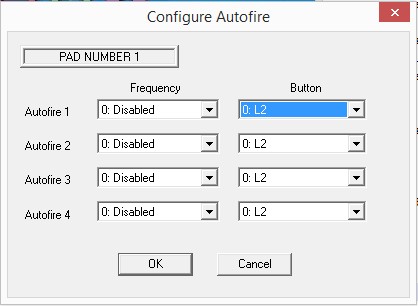 |